In a previous post, I’ve shared a script that allows server administrators to report abusive IPs to the Abuse IP database. But did you know that you can also configure cPanel, and specifically cPHulk Brute Force Protection to automatically report abusive IPs to the database.
First, make sure you follow my previous post to setup the script on your server. Setting up the script to report Login Failure Daemon (LFD) IPs is already covered in my previous post too.
cPHulk Configuration
If you are not already using cPHulk protection on your server, you should enable it so that your cPanel server is protected from brute-force attacks. Specifically, you should enable “IP Address-based Protection” to block any abusive IPs from repeatedly trying to attack accounts on your system.
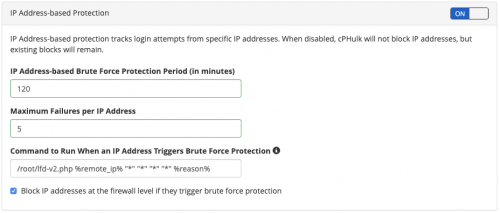
Once enabled, it’s easily to configure cPHulk to report the abusive IPs to the Abuse IP Database. You will see a field called “Command to Run When an IP Address Triggers Brute Force Protection”, which will let you enter the location of the script.
Assuming you have called your script lfd-v2.php, and you’ve stored it in the /root directory, you need to enter the following command in the field:
/root/lfd-v2.php %remote_ip% "" "" "" "" %reason%
If entered correctly, you should see the following in CPHulk:

Next, you should trigger a login failure (ideally using a different IP to the one you’re currently on, so you don’t inadvertently block yourself). I did a test by navigating to my cPanel login page on a mobile device (connected to mobile data), and entered a invalid username and password five times.
If triggered correctly, you should see an entry added to the Abuse IP database, as follows:


What should the command be?
/etc/csf/lfd-v2.php %remote_ip% “*” “*” “*” “*” %reason%
Or
/etc/csf/lfd-v2.php %remote_ip% “” “” “” “” %reason%
You tutorial shows 2 different options.
You can use either. I used * in cPanel command but this is essentially passing generic value. Use the example in the article, not the one from the screenshot.